LEGO Mosaic Maker Picture Upload Guide: Image Size, Crop and Color Settings
A good LEGO mosaic usually starts with a good upload. The mosaic maker can convert many pictures into a buildable pattern, but the result still depends on the source image. A sharp photo with a clear subject gives the grid more useful information to work with. A tiny, dark, or heavily cropped picture often turns into a muddy collection of squares.
This guide walks through the upload settings step by step, from choosing a file to checking the final preview. The same advice works for family projects, classroom activities, gifts, and DIY wall art.
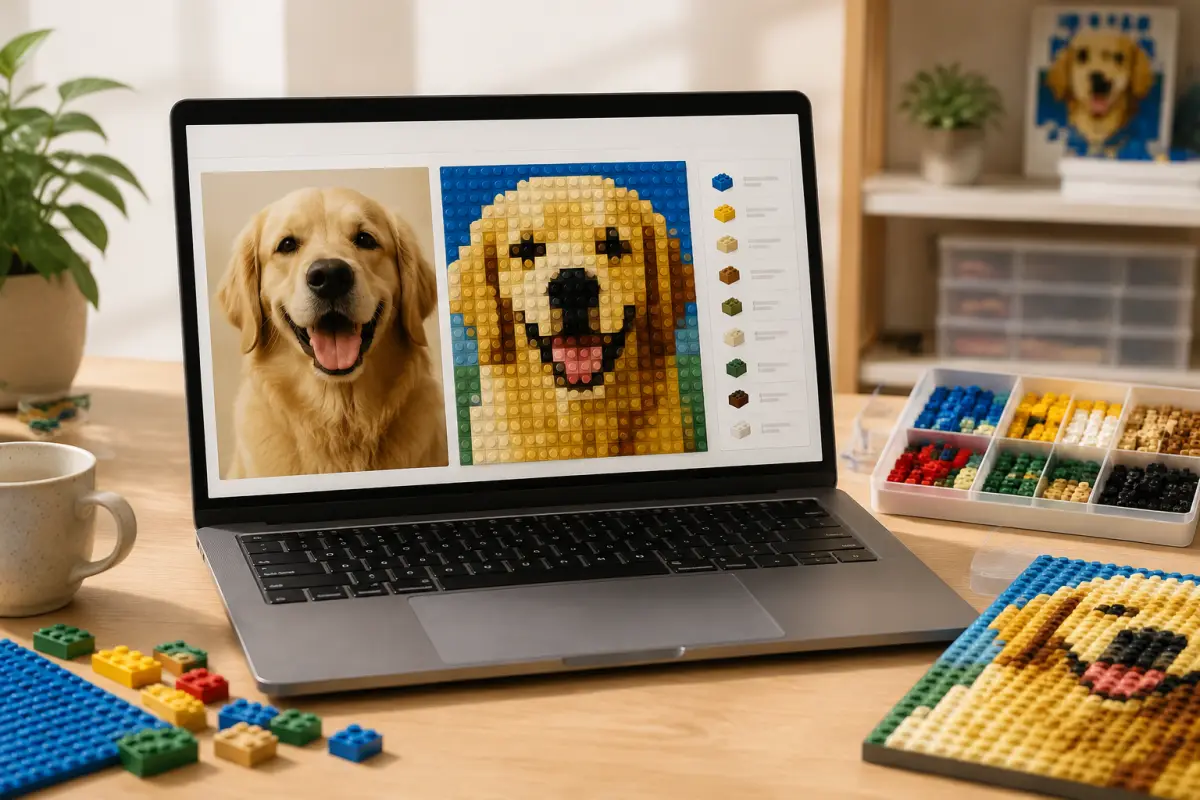
Start with a photo that has a clear subject
Pick a picture where the main subject is easy to recognize at a glance. A face, pet, toy, building, plant, or simple logo usually works better than a busy group scene. The subject should have a visible outline and some separation from the background.
Look at the photo as a small thumbnail before uploading it. If you can still tell what you are looking at, it has a reasonable chance of working as a mosaic. If the important details disappear when the picture is small, a larger grid may not fix the problem. A mosaic replaces fine detail with blocks, so the original image needs strong shapes and color areas.
Good lighting matters too. Avoid a picture where the subject is mostly in shadow or where a bright window removes all detail from the face. Outdoor photos with even light are often easy to convert. Indoor photos can work well when the subject is near a window and the background is not competing for attention.
Which image formats can you upload?
For Brick Mosaic Maker, use JPG, PNG, or WEBP files. These cover most photos from phones, cameras, design apps, and common image editors. JPG is a sensible choice for ordinary photographs because it keeps the file size manageable. PNG is useful for artwork, screenshots, logos, or images that need crisp edges. WEBP is also a good option when your browser or design tool has already exported the image in that format.
Use a normal image file rather than a document or a screenshot of a social media page. The image should be upright, with the correct orientation already saved. Some phone photos store rotation as a separate instruction. If a picture appears sideways in the preview, open it in an editor, rotate it, and export a fresh copy before uploading.
Keep the original file until the mosaic is finished. Make a copy for resizing or cropping so you can return to the full photo if the first framing does not work. Avoid repeatedly saving the same JPG, since each save can soften edges and create compression artifacts around faces and strong color boundaries.
Choose a useful resolution
The source image does not need to be enormous. A clear image around 1,000 to 2,000 pixels on its longest side is usually enough for an online mosaic preview. Larger files are fine when they are clean, but they do not automatically create a more detailed build. The grid size controls the amount of information that appears in the finished pattern.
Think about the number of bricks you are willing to place. A 32 by 32 design has 1,024 positions. A 64 by 64 design has 4,096 positions and takes much longer to assemble. If your uploaded picture is only 400 pixels wide, increasing the mosaic to a very large grid may reveal blur rather than useful detail. If the original is sharp, a larger grid can preserve more of the eyes, lettering, or small shapes.
Small project
Use a clear subject and a modest grid for a quick family or classroom build. Prioritize the outline over tiny details.
Medium project
Use a sharper image with visible facial features, fur, or lettering. Check the preview at the intended viewing distance.
Large project
Choose a high quality source and expect more sorting, more bricks, and more time on the build.
Do not upscale a blurry image just to make its pixel dimensions larger. Upscaling adds empty pixels; it does not restore detail. A well-composed 1,200-pixel photo is more useful than a soft 4,000-pixel copy.
Crop the picture before the grid crops it
Most mosaic makers fit a rectangular image into a rectangular grid. If your photo and grid use different proportions, the tool may crop the sides or the top and bottom. Check the crop preview carefully. Make sure the eyes, hands, ears, lettering, or other details you care about remain inside the visible area.
Square crops are a reliable starting point for portraits, pets, and single objects. A wider crop suits landscapes, vehicles, shelves, and group photos. A tall crop can work for a standing person or a narrow architectural subject, but it may waste space if the final mosaic is wide.
Move the crop focus rather than shrinking the subject until the whole background fits. For a pet portrait, the face should usually take up a meaningful part of the frame. For a group photo, leave enough room around each person to keep the figures separate. When people overlap heavily, try a different photograph instead of relying on color adjustments to separate them.
Select the right background
The background affects how clearly the main subject reads. A plain wall, sky, floor, or softly blurred outdoor area gives the subject room to stand out. A background with many small objects can create a noisy mosaic, especially at a low grid size.
If the tool offers a background choice or background color, use it to support the subject. A light background can help a dark outline show up. A dark background can make a pale face, white animal, or bright lettering easier to see. The best choice is not always the color that appears most often in the original photo. It is the color that leaves enough separation around the subject.
Watch for backgrounds that share the same color as the subject. A brown dog against a brown sofa may lose its body outline. A red shirt against a red wall can become one large shape. You may be able to improve the separation with contrast, but changing the photo or crop is usually the cleaner solution.
Adjust contrast before chasing more color
Contrast controls the difference between light and dark areas. A small increase can make a face, pet, or object easier to read in the mosaic. It can also separate a subject from a flat background. Increase it gradually and inspect the preview after each change.
Too much contrast creates a different problem. Shadows can become a single black mass, while bright areas turn into white patches. You may lose the middle tones that make a face look round or that separate folds in clothing. If the preview looks harsh, lower the contrast or start with a better exposed photo.
Brightness and contrast work together. If the whole image is dark, raise brightness a little before adding contrast. If the image is already pale, a small contrast adjustment may be enough. Make changes for the final brick colors, not for the original screen image. A mosaic has fewer tones than a photograph, so subtle edits can have a large effect on the pattern.
How to judge the color preview
Do not judge the design only by counting how many colors it uses. More colors do not always mean a better mosaic. A limited palette can produce a cleaner image that is easier to sort and build. What matters is whether the important light, medium, and dark areas remain distinct.
Look for three things in the preview. First, can you recognize the subject without zooming in? Second, do the main edges remain visible? Third, are there large areas of random speckling? Speckling usually means the source has texture, compression noise, or many similar tones that the available palette is trying to approximate.
For colorful photos, check that nearby colors do not collapse into one muddy area. Bright red, yellow, blue, or green sections can look great when they have clear boundaries. A photo with a gentle sunset or soft pastel clothing may need more contrast because the colors are close together.
Photo ideas that work well
- A close portrait with even light and a simple background.
- A pet looking toward the camera, with the eyes and nose clearly visible.
- A favorite toy or minifigure photographed against a plain surface.
- A building or landscape with a strong horizon and a few large shapes.
- A bold logo or piece of artwork with clean edges and limited colors.
- A family photo where the people are not too far away or tightly overlapped.
Photos that often need extra work include distant subjects, night scenes, heavy backlighting, reflective surfaces, dense shelves, and images with tiny text. They are not impossible, but you may need a tighter crop, a larger grid, or a simpler version of the image.
A simple upload checklist
- Save a copy of the original photo.
- Crop it so the subject has a clear position and useful proportions.
- Export it as JPG, PNG, or WEBP with the correct orientation.
- Upload the file and check that the preview is not blurry or sideways.
- Choose a grid size that matches your time, brick supply, and display distance.
- Set the background so the subject has a visible outline.
- Adjust brightness and contrast in small steps.
- Review the color preview and material count before downloading the pattern.
When the result is close but not quite right, change one setting at a time. Try a new crop first, then background, then contrast. Changing everything together makes it difficult to tell which adjustment helped.
Give yourself a test run
For a first project, use a photo that you can replace without disappointment. Generate a smaller pattern, inspect the color count, and build a corner or a short row before committing to a large display. This quick test shows whether the selected colors are available in your collection and whether the picture still looks right when represented by real bricks.
The best upload is the one that makes the building process clear. Choose a recognizable subject, give it enough space, keep the crop intentional, and use contrast to support the important shapes. With those decisions made before the first brick is placed, the mosaic maker has a much better chance of turning your personal photo into a colorful design that is fun to build and easy to read.
